

STANDARD SCREEN fig.
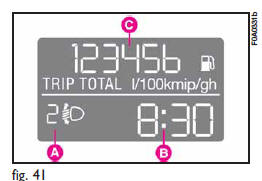
The standard screen shows the following indications:
A - Headlight aiming position display (with dipped beam headlights on).
B - Clock.
C - Odometer (km or miles covered).
Note With ignition key removed, when opening one of the front doors the display comes on showing the clock and km/mi covered for a few seconds.
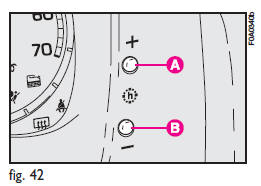
CLOCK fig. 42
To adjust the clock press button A to increase minutes and button B to decrease minutes. The clock will advance by one unit each time the button is pressed. Press the button and hold it down for a few seconds to rapidly advance the time automatically.
When the clock draws near to the correct time, release the button and complete the regulation manually.
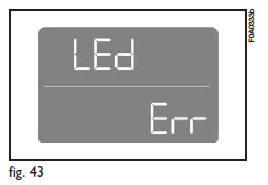
WARNING LIGHT TEST fig. 43
The following warning lights are tested:
– handbrake on/low brake fluid level;
– ABS and EBD system (where provided);
This tests are carried out automatically when turning the ignition key to MAR and during normal operation when a fault is found. At the end of the initial check, the display will show failures, if any (through one or more warning lights) by the wording LEd Err flashing for about 10 seconds.
See also:
Electronic Vehicle Information Center (EVIC)
The Electronic Vehicle Information Center (EVIC) features a driver-interactive
display that is located in the instrument cluster.
Electronic Vehicle
Information Center (EVIC) Display
The EVIC ...
iPod /USB/Media Player Control — IfEquipped
This feature allows an iPod or external USB device to be plugged into the USB
port, located in the glove compartment.
1 — iPod Or External USB Device Holder
2 — Cable Jack
3 — USB Connector
Re ...
Ignition device
The key can be turned to 4 different positions fig. 26:
– STOP: engine off, key can be removed, steering column locked. Some electrical
devices can be worked (e.g.
sound system, electric window wi ...