

IMPORTANT
Open and close the wing window only when the vehicle is stationary.
The Fiat Doblò may fit a handy wing window on the roof on the back of the load compartment to carry long objects.
Opening the wing window
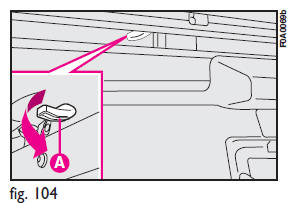
To open the wing window, pull lever A-fig. 104 downwards in the direction of the arrow.
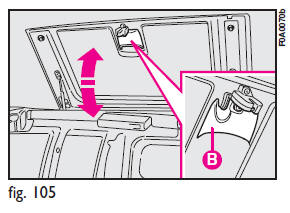
Put your hand in handle B-fig. 105 and lead the wing window while it opens.

Do not exceed 110 km/h speed with wing window open. Risk of (violent) wing window closing.
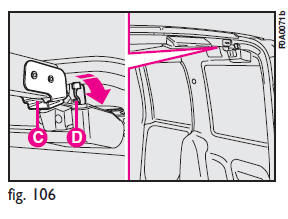
The mobile cross member C-fig. 106 can be tipped down to facilitate loading and unloading long objects.
To tip, hold the cross member with your left-hand and move the lever D with your right-hand in the direction of the arrow until it clicks.
Lower the cross member carefully until it reaches its position. Unload the vehicle and take the cross member back to its original position.
Closing the wing window
Take the mobile cross member Cfig.
106 back to its original position;
fit the cross member pin C in the original housing until it clicks.
Pull the wing window in the direction shown in fig. 105, fitting your hand in handle B. The wing window is closed once it clicks.
IMPORTANT
Arrange the load evenly along the cross member and fasten it with ropes or similar.
IMPORTANT
Never leave the cross member unfastened while the vehicle is moving.
Moving the vehicle when the cross member is not fastened in its housing can cause severe damage to the load compartment structure. Furthermore, only the bottom of the rear doors would be locked and this could damage the hinges.
See also:
Radio Operation
Pressing the top of the switch will “Seek” up for the next listenable station
and pressing the bottom of the switch will “Seek” down for the next listenable station.
The button located in the cente ...
Fixed passenger seat
Adjusting the reclining seat back
Lift lever A-fig. 52.
...
Jacking the car
WITH THE JACK
See “If a tyre is punctured” in this section.
WITH A SHOP JACK
From the front
Jack up the car only by positioning the jack arm at the gearbox/differential
and placing a rubber ...