

Single rear seat
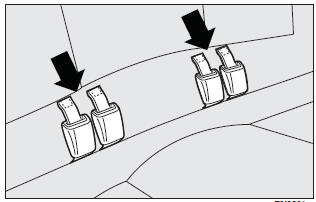
Proceed as follows:
❒ fasten the seat buckles to the tabs on the seat back (as shown by arrows);
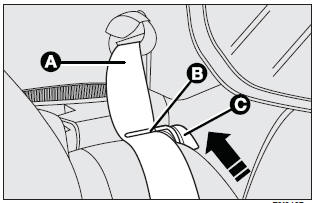
❒ check that the webbing (A) of each of the two side seat belts is inserted into
the respective belt guiding catch (B);
❒ release the seat back moving the levers (C) as shown by the arrow. Tilt it to
make a single loading surface with the boot floor.
Split rear seat back (where provided)
The boot can be extended completely or partially.
For partial extension fold the required seat side; proceed as follows:
❒ remove the parcel shelf (see next paragraph);
❒ press the button by the side of the two supports and remove the head restraints
by pulling them upwards;
❒ check that the webbing (A) of each of the two side seat belts is inserted into
the respective belt guiding tongue (B);
❒ release the seat back moving lever (C), then tilt it.
To fold the whole seat, lift the cushion and then tip the seat backs as described for the rear single seat.
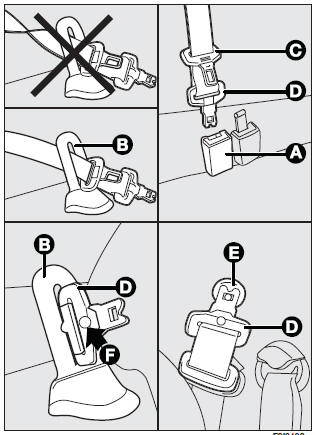
The central three-point seat belt and reel mechanism (where fitted) can be removed as follows:
❒ press the black button on the buckle (A) if the seat belt is fastened;
❒ take the central belt slowly to the loop retainer (B) on the upper part of the
seat back and remove the second tongue (C) from the loop retainer;
❒ remove the first tongue (D) from the loop retainer and fasten it to the specific
pin (E) on the rear pillar panel;
To restore conditions for use:
❒ release the first tongue (D) from pin (E);
❒ insert the first tongue (D) in loop retainer (B) without twisting the belt. Make
notch (F) on the belt tongue coincide with the respective groove on the loop retainer
and insert the second tongue (C) in the loop retainer;
❒ pull the belt gently through loop retainer (B), and fasten the first tongue (D)
in buckle (A) (grey with black button). Make the two yellow dots (one on the tongue
and one on the buckle) coincide.
See also:
Driving style
Starting
Do not warm the engine when the vehicle is stationary or at high or low revs:
in this way the engine will warm up gradually increasing consumption and emissions.
You should drive off slo ...
Heated Seats — If Equipped
On some models, the front driver and passenger seats may be equipped with heaters
in both the seat cushions and seatbacks. The controls for the front heated seats
are located on the center instrum ...
Dynamic and distinguished
The new 2012 Fiat Punto maintains the model's instantly recognisable and
dynamic shape but it's been made even more elegant and characterful thanks to a
host of detail changes, inside and out.
O ...