

WITH THE JACK
See “If a tyre is punctured”, in this section.
![]() The jack should only be used to change a wheel on the vehicle for which it
was designed. It should not be put to other uses or employed to raise other models.
Under no circumstances should it be used when carrying out repairs under the vehicle.
The jack should only be used to change a wheel on the vehicle for which it
was designed. It should not be put to other uses or employed to raise other models.
Under no circumstances should it be used when carrying out repairs under the vehicle.
![]() An incorrectly positioned jack may cause the vehicle to fall. Do not use the
jack to lift loads exceeding that indicated on the label attached to the jack itself.
An incorrectly positioned jack may cause the vehicle to fall. Do not use the
jack to lift loads exceeding that indicated on the label attached to the jack itself.
Please note:
– The jack requires no adjustments.
– The jack cannot be repaired. If it breaks it must be replaced with a new jack;
– No other tool, part from the handle shown in this chapter, can be fitted to the jack.
WITH A SHOP JACK
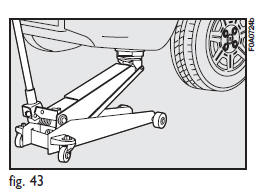
From the front
Jack up the vehicle only by positioning the jack arm at the gearbox/differential and placing a rubber pad in between, as shown in fig. 43.
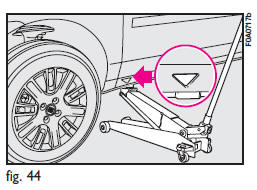
From the side
Jack up the vehicle only by positioning the jack arm at the gearbox/differential and placing a rubber pad in between, as shown in fig. 44.
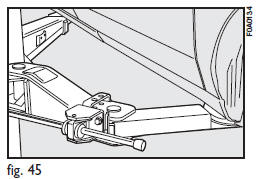
WITH AN ARM HOIST
Jack up the vehicle by arranging the ends of the arms in the areas shown in fig. 45.
See also:
Loading ramps
Loading ramps are available at Line accessory Fiat.
Loading with ramps shall be only carried out with the vehicle stationary and
handbrake engaged.
Never move the vehicle with ramps extracted.
...
Suspensions
FRONT
Independent wheel, McPherson suspension with steel wishbones anchored to an auxiliary
cross member.
Coil springs and sway bar.
Double acting telescopic hydraulic shock absorbers.
REAR
Sti ...
Speed limit (Speed Lim.)
With this function it is possible to set the car speed limit which, if exceeded,
automatically sounds a buzzer and makes the warning light è with the special message
on the display (see “Wa ...