

GLOVE BOX fig. 95
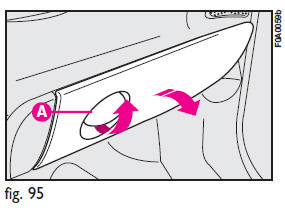
Operate handle A as shown by the arrow to open the compartment.
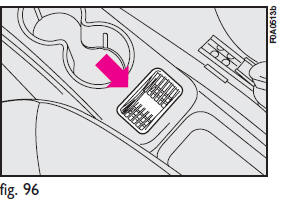
MAGNETIC CARD POCKET - TICKET POCKET fig. 96 (where provided)
Slots for keeping magnetic cards (telephone cards, etc.) or coins can be found on the central tunnel.
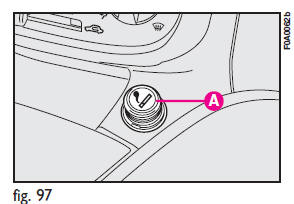
CIGAR LIGHTER fig. 97
With ignition key at MAR: press button A; after approximately 15 seconds it will return to its initial position and is ready for use.
IMPORTANT
Always make sure the cigar lighter does in fact pop out after it has been pushed in.
![]() Important. The cigar lighter gets very hot.
Important. The cigar lighter gets very hot.
Handle with care and do not let children use it: danger of fire or burns.
POWER SOCKET (where provided)
The vehicle is fitted with a power socket A-fig. 98 set on the dashboard (on the left of the gearbox) that only works with ignition key at MAR. Do not use current sockets for accessories with power over 180 W (max. intake 15 A).
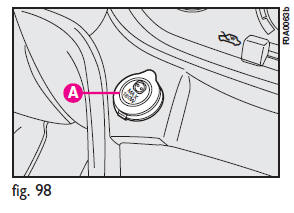

Do not use the sockets for accessories with power over the max. specified one.
Prolonged use of accessories with high current intake could deploy the battery, even preventing the engine from starting.
ASHTRAY fig. 99
Pull flap A towards yourself. Remove the ashtray B by pulling it upwards for emptying it.
Non smokers can remove the ashtray and use it as additional oddment compartment.

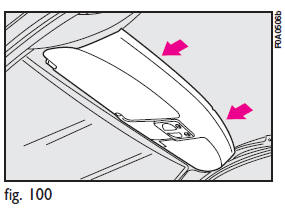
ODDMENT SHELF fig. 100
The shelf is fitted over the sun visors.
It was designed to easily house lightweight objects (e.g. documents, road maps, etc.).
IMPORTANT
The shelf was designed for loads not exceeding 3 kg on each side. Consequently, do not arrange objects exceeding these weights. Do not use the points shown as grips fig.
100. Use the specific side handles.
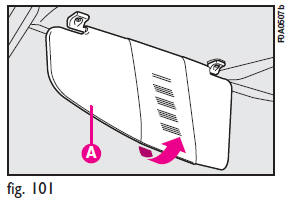
SUN VISORS fig. 101
The sun visors A are positioned to the sides of the rear-view mirror.
They can swing up and down, as shown. A ticket pocket can be found on the back of the sun visor driver's side. A courtesy mirror is applied to the back of the sun visors.
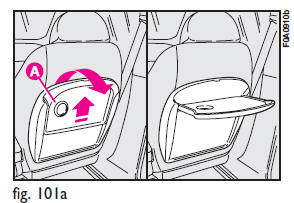
TILTING SHELF (for passengers transport versions, where provided)
Behind the front passenger seatback, it is available (on certain versions) a tilting shelf A-fig. 101a.
To position it horizontally, pull it towards the direction shown by the arrows;
reverse this operation to reposition it.
IMPORTANT
Do not position on the tilting shelf objects heavier than 3 kg: for safety purposes the shelf is released from its housing when submitted to excessive loads.
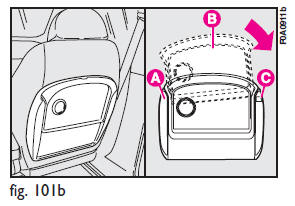
Resetting the shelf (after releasing)
Proceed as follows:
– fit the shelf B-fig. 101b so that the support fixed pin A is fitted inside the shelf left rail;
– turn the shelf B until the lower edge is touching the support A mobile pin C;
– press slightly in arrow direction to set the shelf B in the position of use.
Pin C is inside the shelf right rail.
![]() Never travel with the shelf tilted. The shelf or the objects on it can cause
injuries in the event of a crash.
Never travel with the shelf tilted. The shelf or the objects on it can cause
injuries in the event of a crash.
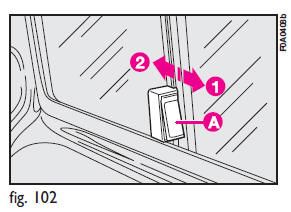
SIDE SLIDING WINDOW (longitudinal sliding)
The windows slide open.
1) Keep pressed button A-fig. 102 to release the sliding window.
2) Push the window in the direction of the arrow (1), to open as required.
3) To close, pull the sliding window in the direction of the arrow (2) until you hear it click.
REAR SIDE WINDOWS
The windows open outwards.
1) Move the lever as shown in fig. 103.
2) Push the lever outwards to open the window completely.
3) Push the lever back until it clicks.
To close the windows, pull the lever the opposite direction until it clicks.

See also:
Engine coolant fluid
The coolant level shall be checked with cold engine and shall be included between
the MIN and MAX mark on the reservoir.
If the level is low, pour slowly a mixture of 50% distilled water and 50 ...
External light failure
(amber)
The warning light turns on when one of the following lights is failing:
– sidelights
– brake lights (third brake light excluded)
– rear fog guards
– direction indicators
– numb ...
Liftgate
To unlock the liftgate, use the Remote Keyless Entry (RKE) transmitter or activate
the power door lock switches located on the front door handles.
To open the liftgate, squeeze the liftgate release ...