

The vehicle can be provided with the reconfigurable multifunction display that shows useful information, according to the previous settings made, necessary when driving.
“STANDARD” SCREEN fig. 44
The standard screen shows the following indications:
A - Date
B - Odometer (km or miles covered)
C - Clock
D - External temperature (where provided)
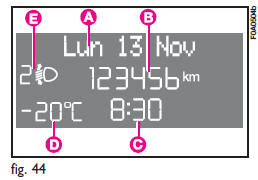
E - Headlight aiming position (only with dipped beam headlights on).
Note With key removed, when opening one of the front doors, the display will turn on and show for a few seconds the clock and the km or mi covered.
CONTROL BUTTONS fig. 45
+ To scroll the displayed menu and the related options upwards or to increase the value displayed .
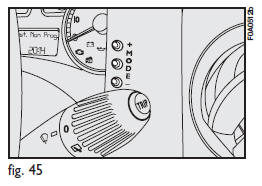
MODE
Brief press to open the menu and/or to move to next screen or to confirm the the option required.
Long press to go back to the standard screen.
– To scroll the displayed menu and the related options downwards or to decrease the value displayed.
Note
Buttons + and – activate different functions according to the following situations:
To adjust light inside the passenger compartment
– when standard screen is active, to adjust brightness inside the passenger compartment.
Setup menu
– to scroll the menu options upwards and downwards;
– to increase or decrease values during settings.
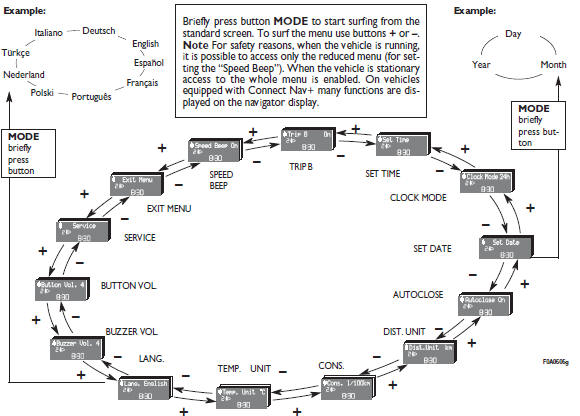
SETUP MENU
The menu comprises a series of functions arranged in a “circular fashion” which can be selected through buttons + and – to access the different select operations and settings (setup) given in the following paragraphs.
The setup menu can be activated by pressing briefly button MODE.
Single presses on buttons + or – will scroll the setup menu options.
Handling modes differ with each other according to the characteristic of the option selected.
Selecting a menu option – press briefly button MODE to select the menu option to set;
– press buttons + or – (by single presses) to select the new setting;
– press briefly button MODE to store the new setting and to go back to the previously selected menu option.
Selecting “Set Date” and “Set time”:
– briefly press button MODE to select the first value to change (e.g.
hours /minutes or year / month / day);
– press buttons + or – (by single presses) to select the new setting;
– briefly press button MODE to store the new setting and to go to the next setup menu option, if this is the last one you will go back to the previously selected option of the main menu.
Press button MODE for long:
– to quit the setup menu and to save only the settings stored yet by the user (and confirmed by pressing briefly button MODE).
The setup menu displaying is timed;
when quitting the menu due to timing expiry, only settings stored yet by the user (and confirmed by pressing briefly button MODE) will be saved.
Briefly press button MODE to start surfing from the standard screen. To surf the menu use buttons + or –.
Note For safety reasons, when the vehicle is running, it is possible to access only the reduced menu (for setting the “Speed Beep”). When the vehicle is stationary access to the whole menu is enabled. On vehicles equipped with Connect Nav+ many functions are displayed on the navigator display.
Speed limit (Speed Beep)
With this function it is possible to set the vehicle speed limit (km/h or mph), when this limit is exceeded the driver is immediately alerted (see section “Warning lights and messages”).
To set the speed limit, proceed as follows:
– briefly press button MODE: (Off) will flash on the display;
– press button +: (On) will flash on the display;
– briefly press button MODE and then + or – to set the required speed (during setting the value flashes).
Note The possible setting is between 30 and 250 km/h, or between 20 and 155 mph depending on the unit set previously (see “Distance unit (Dist. Unit)” paragraph described later.
Every press on button + / – increases/ decreases by 5 units. Keeping the button + / – pressed obtains the automatic fast increase or decrease.
When you are near the required setting complete adjustment by single presses.
– briefly press button MODE to go back to the menu screen or press the button for long to go back to the standard screen without storing settings.
To cancel the setting, proceed as follows:
– briefly press button MODE: (On) will flash on the display;
– press button –: (Off) will flash on the display;
– briefly press button MODE to go back to the menu screen or press the button for long to go back to the standard screen without storing settings.
Trip B On/Off (Trip B)
Through this option it is possible to activate (On) or deactivate (Off) the Trip B (partial trip).
For further details see paragraph “Trip computer”.
For activation / deactivation, proceed as follows:
– briefly press button MODE: (On) or (Off) will flash on the display (according to previous setting);
– press button + or – for setting;
– briefly press button MODE to go back to the menu screen or press the button for long to go back to the standard screen without storing settings.
Set clock (Set clock)
This function enables to set the clock.
To set the clock (hours - minutes) proceed as follows:
– briefly press button MODE:
“hours” will flash on the display;
– press button + or – for setting;
– briefly press button MODE: “minutes” will flash on the display;
– press button + or – for setting.
Note
Every press on the button + or – increases/decreases by one unit.
Keeping the button pressed obtains automatic fast increase/decrease.
When you are near the required setting complete adjustment by single presses.
– briefly press button MODE to go back to the menu screen or press the button for long to go back to the standard screen without storing settings.
Clock mode (Clck. Mode)
This function is used to set the clock in the 12h (12 hours) or 24h (24 hours) mode.
For setting proceed as follows:
– briefly press button MODE 12h or 24h will flash on the display (according to previous setting);
– press button + or – for setting;
– briefly press button MODE to go back to the menu screen or press the button for long to go back to the standard screen without storing settings.
Set date (Adjust Date)
This function enables to update the date (year - month - day).
To correct the date proceed as follows:
– briefly press button MODE:
“year” will flash on the display;
– press button + or – for setting;
– briefly press button MODE:
“month” will flash on the display;
– press button + or – for setting;
– briefly press button MODE: “day” will flash on the display;
– press button + or – for setting.
Note
Every press on the button + or – increases/decreases by one unit.
Keeping the button pressed obtains automatic fast increase/decrease.
When you are near the required setting complete adjustment by single presses.
– briefly press button MODE to go back to the menu screen or press the button for long to go back to the standard screen without storing settings.
“Temperature” unit (Temp. Unit) (where provided)
This function enables to set the temperature unit (°C or °F).
To set the required unit proceed as follows:
– briefly press button MODE: °C or °F will flash on the display (according to previous setting);
– press button + or – for setting;
– briefly press button MODE to go back to the menu screen or press the button for long to go back to the standard screen without storing settings.
Selecting the language (Lang.)
Display messages can be shown in different languages: Italian, German, English, Spanish, French, Portuguese, Polish and Dutch.
To set the required language proceed as follows:
– briefly press button MODE: the previously set “language” will flash on the display;
– press button + or – for setting;
– briefly press button MODE to go back to the menu screen or press the button for long to go back to the standard screen without storing settings.
Adjusting the failure/warning buzzer volume (Buzzer Vol.)
With this function the volume of the buzzer accompanying any failure/warning indication can be adjusted according to 8 levels.
To adjust the volume proceed as follows:
– briefly press button MODE: the previously set volume “level” will flash on the display;
– press button + or – for setting;
– briefly press button MODE to go back to the menu screen or press the button for long to go back to the standard screen without storing settings.
Adjusting the button volume (Button Vol.)
With this function the volume of the roger-beep accompanying the activation of buttons MODE, + and – can be adjusted according to 8 levels.
To adjust the volume proceed as follows:
– briefly press button MODE: the previously set volume “level” will flash on the display;
– press button + or – for setting;
– briefly press button MODE to go back to the menu screen or press the button for long to go back to the standard screen without storing settings.
Scheduled Servicing (Service)
Through this function it is possible to display information connected to proper vehicle servicing.
Proceed as follows:
– briefly press button MODE: service in km or mi, according to previous setting, will be displayed (see paragraph “Distance unit”);
– press button + or – to select displaying in days;
– briefly press button MODE to go back to the menu screen or press the button for long to go back to the standard screen.
Note The “Service schedule” includes vehicle maintenance every 20,000 km (or 12,000 mi) or every year; this is shown automatically, with the ignition key at MAR, starting from 2,000 km (or 1,240 mi) or 30 days from this deadline and it is shown again every 200 km (or 124 mi) or 3 days.
Below 200 km servicing indications are displayed more frequently. As concerns 1.3 Multijet versions, change air cleaner, engine oil and engine oil filter at the intervals specified in the Service schedule, see section “Vehicle maintenance”. Service indications will be displayed km or mi according to previous unit setting. When a programmed maintenance interval (coupon) is near to come, turning the ignition key to MAR, the display will show the message “Service” followed by the number of km/mi to go before vehicle servicing. “Scheduled servicing” message is displayed in km/mi or days according to the approaching service interval. Contact Fiat Dealership to carry out any service operation provided by the “Service schedule” or “Annual inspection schedule”, and to reset the display.
Exit Menu
This is the last function that closes the circular setting cycle listed in the initial menu screen.
Briefly press button MODE to go back to the standard screen.
Press button – to return to the first menu option (Speed Beep).
See also:
Incomplete door locking
The warning light on the dial turns on (on certain versions together with the
message on the display) when one or more doors, the boot (indication fitted on some
versions only) or the bonnet ...
If You Need Assistance
The manufacturer and its authorized dealers are vitally interested in your satisfaction.
We want you to be happy with our products and services.
Warranty service must be done by an authorized deale ...
Access to menu screen
After the “Initial check”, it is possible to access the menu screen pressing
the button .
To surf the menu press buttons + or –.
IMPORTANT If after entering the menu no setting/adjustment is perfo ...