

Front seats
According to the version, the head restraints can be:
– fixed fig. 61;
– adjustable in height fig. 61a.
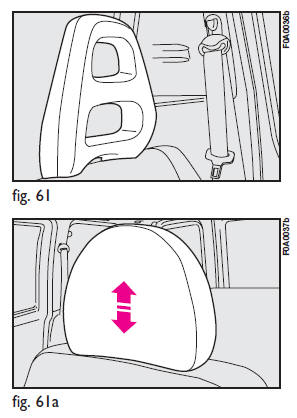
To adjust, move the head restraint upwards or downwards until it clicks.
Make sure it is properly locked in place.
Fixed head restraints cannot be removed.
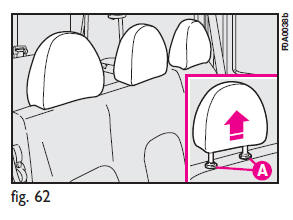
Rear seats, 5-seat versions
The height of the rear head (where provided) restraints can be adjusted fig. 62.
To remove the rear head restraints, remove the rear window shelf (see “Boot” in this chapter), press buttons A-fig. 62 by the side of the stands and pull the head restraint upwards.
![]() Remember that the head restraints should be adjusted to support the back of
your head and not your neck. Only if they are in this position will they be able
to provide effective protection.
Remember that the head restraints should be adjusted to support the back of
your head and not your neck. Only if they are in this position will they be able
to provide effective protection.
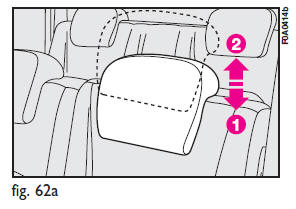
Rear seats, 7-seat versions
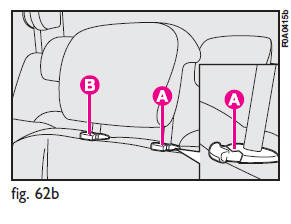
Head restraints for rear seats are mobile fig. 62a. To use head restraints, raise them from non-use position (1) to use position (2). To set them back to “non-use position” (1), press the outer button A-fig. 62b and push down the head restraint. Rear head restraints can be removed; to remove them: press buttons A and B and then raise them to complete removal.
![]() Only make adjustments when the vehicle is stationary.
Only make adjustments when the vehicle is stationary.
The particular head restraint shape voluntarily interferes with the passenger’s back leaning on the rear seat in order to force him/her to lift the head restraint and use it correctly.
IMPORTANT
Rear passengers shall always set head restraints to position (2) when traveling.
See also:
Instrument panel, display and button lighting adjustment (light rheostat)
With this function it is possible to adjust the lighting (dimming/brightening)
of the instrument cluster, and two-zone climate control display (where required).
To adjust proceed as follows:
&nb ...
Menu description
The menu comprises a series of functions arranged in a “circular fashion” which
can be selected through buttons + and - for access to the different select operations
and settings (see examples “La ...
Folding Mirrors
The exterior mirrors are hinged to allow the mirror to pivot forward or rearward
to help avoid damage. The mirror has three detent positions: full forward, normal
and full rearward. ...