

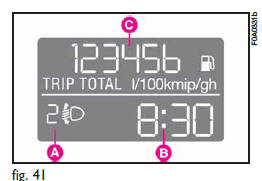
STANDARD SCREEN fig.
The standard screen shows the following indications:
A - Headlight aiming position display (with dipped beam headlights on).
B - Clock.
C - Odometer (km or miles covered).
Note With ignition key removed, when opening one of the front doors the display comes on showing the clock and km/mi covered for a few seconds.
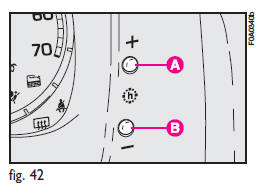
CLOCK fig. 42
To adjust the clock press button A to increase minutes and button B to decrease minutes. The clock will advance by one unit each time the button is pressed. Press the button and hold it down for a few seconds to rapidly advance the time automatically.
When the clock draws near to the correct time, release the button and complete the regulation manually.
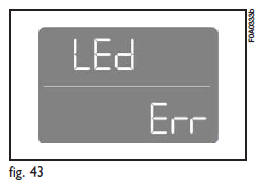
WARNING LIGHT TEST fig. 43
The following warning lights are tested:
– handbrake on/low brake fluid level;
– ABS and EBD system (where provided);
This tests are carried out automatically when turning the ignition key to MAR and during normal operation when a fault is found. At the end of the initial check, the display will show failures, if any (through one or more warning lights) by the wording LEd Err flashing for about 10 seconds.
See also:
Life Of Tire
The service life of a tire is dependent upon varying factors including, but not
limited to:
• Driving style
• Tire pressure
• Distance driven
WARNING!
Tires and the spare tire should be replac ...
Automatic Transmission – If Equipped
The shift lever must be in the PARK or NEUTRAL position before you can start
the engine. Apply the brakes before shifting to any driving gear.
NOTE: You must press the brake pedal before shifting ...
How to keep the seatbelts in proper working order at all times
1) When wearing the seat belts, always ensure they are not twisted and are free
to wind in and out.
2) Following a serious accident, replace the belt being worn at that time, even
if it does not ...